REVIEW · GRAND CANYON NATIONAL PARK
Grand Canyon South & East Rim: Driving & Walking Audio Tour
Book on Viator →Operated by Travel with Action · Bookable on Viator
Stop counting minutes; let the canyon talk. This Grand Canyon South & East Rim audio route strings together 30+ miles of driving, walking, and free shuttles with 55+ location-triggered stories. I love that it’s priced per vehicle (up to 4 people), and I love the offline setup so you’re not stuck waiting for cell service. One catch: if your start point or shuttle choices are off, the whole experience can feel harder than it needs to be.
You can start when you’re ready, pause for snacks and photos, and finish when you’re done. The audio is designed to play as you move from one viewpoint to the next, so you’re not hunting for what to look at.
Because parts of the rim are easiest via shuttle, you’ll want to bring your patience and your phone audio figured out before you roll. If you do that, the canyon stays the main event.
In This Review
- Key Points Before You Go
- Why This South Rim Audio Route Feels Like Freedom
- Price and Value: $16.99 Beats the Cost of Getting Guided
- Download and Setup: The Part That Makes or Breaks It
- Getting Oriented: South Entrance to Grand Canyon Village
- Mather Point to Yavapai: First Big Views, Then Meaning
- Hopi House and the Studio Rivalry: Human Stories on the Rim
- Hermit Road Shuttle Stops: Best Way to Do These Viewpoints
- Bright Angel Trail Views at Trailview Overlook
- Maricopa Point to Powell Point: Mining, Exploration, and Scale
- Hopi Point and Mohave Point: Eagles, River Power, and Quiet Details
- Granite Rapids at Monument Creek Vista and Pima Point Listening
- Desert View Drive: Birding Chances and Big Rim Views Toward the Watchtower
- Grandview, Lipan, and Navajo Points: Choose Your Angle of the Canyon
- Desert View Watchtower: The Iconic Finish
- South Kaibab Trail and Tusayan Ruins: Two Stops With a Different Tempo
- Pacing It Right: How to Keep the App and Your Day in Sync
- Who Should Book This (and Who Might Skip It)
- Should You Book This Grand Canyon South & East Rim Audio Tour?
- FAQ
- Is the $16.99 price per person?
- Does this include Grand Canyon entry fees?
- Can I use the audio tour without cell service?
- Is this a guided tour where someone meets you?
- Do I need the shuttle to reach some stops?
- How long does the tour take?
Key Points Before You Go

- Per-car value: one purchase covers up to 4 people in your vehicle
- Offline-friendly: download with strong signal first, then keep going without service
- Location-triggered audio: stories play based on where you are, not just a timer
- Mix of drive and walk: you’ll do short walks, plus viewpoint hopping via free shuttle in some areas
- Big stop list: Mather, Yavapai, Hermit Road overlooks, Desert View Drive, and more
Why This South Rim Audio Route Feels Like Freedom

The Grand Canyon is too big for rigid schedules. This tour is built for the way you’ll actually experience it: stop when the view hits, walk when you feel like it, then get back in the car without losing the story.
The real win is that the audio is tied to your position. That means you’re more likely to match the narration to the overlook in front of you, instead of listening to a random history lesson while you’re driving past it.
Yes, some parts involve shuttles and some walking. But the upside is control. You can spend 10 minutes at a point, or 30. You’re not waiting on a group.
Other South Rim tours we've reviewed at the Grand Canyon


Price and Value: $16.99 Beats the Cost of Getting Guided
At $16.99 per group (up to 4), this is one of those “math is on your side” options. If you’re traveling as a couple, family, or small group, the per-vehicle model can make it far cheaper than hiring a guide or joining a paid group tour.
Also, you’re not paying for a one-time event. The download comes with lifetime access and no expiry, so you can use it again on another trip or replay parts you want to revisit.
The main value trade-off is that this is still self-guided. You won’t have a live person correcting your route. If you like getting directions without thinking, this is great. If you hate tech setup, you’ll want to plan for that.
Download and Setup: The Part That Makes or Breaks It

This tour uses a separate audio app. After booking, you get an email/text with setup instructions and a password. You’re told to download while you’re on strong wifi/cellular, then it works offline after that.
So your best move is simple:
- Download the tour before you enter areas where service gets sketchy.
- When you’re using the tour, keep the app open enough that it can follow your location.
- For driving, you can connect your phone to your car stereo with Bluetooth, USB, or AUX.
If you’re walking parts of the route, headphones are a smart idea. It keeps the audio clear and lets you hear the step-by-step shuttle instructions.
Also, there’s no guide meeting you at the start. You go to the starting point and begin the first story point so the narration starts automatically. If you try to start too late or at a different spot, you may get narration that doesn’t match what you’re seeing.
Getting Oriented: South Entrance to Grand Canyon Village

The tour starts near the South Entrance Station, where you get a quick run-through of entrance fee options. That’s useful because it removes one of the most annoying travel unknowns: figuring out what you’re paying for before you’re already in the park mood.
From there, you head into Grand Canyon Village. Your audio nudges you toward the Visitor Center area first—exactly where you want to be if you need maps, restrooms, or snacks.
If you want the canyon experience to feel smooth, this is the right order. You get information before you start chasing viewpoints.
Mather Point to Yavapai: First Big Views, Then Meaning

Your first major “wow” stop is Mather Point. The narration frames it as one of the park’s top viewing locations, with line-of-sight across the canyon (up to about 30 miles in clear conditions).
Then you move to Yavapai Point. What I like here is that the audio isn’t only about geology and distance—it also gets into the people connected to the names. The point is named for the tribe tied to the area, and the story adds context instead of treating the canyon like a blank postcard.
After Yavapai, you’ll have the option to stop at the Yavapai Geology Museum for exhibits. If you’re the type who likes to understand what you’re looking at, this breaks up the pure viewpoint rhythm with something hands-on.


Hopi House and the Studio Rivalry: Human Stories on the Rim

Next up is Hopi House, a recreation of ancient Hopi dwellings you’d expect to find while the Hopi people still lived in the area. The audio treats it like a real interpretive stop, not just a photo op, and it’s also where you can look for handmade souvenirs.
Then you’ll hit Kolb Studio and Lookout Studio—two buildings perched right near the canyon edge. The tour tells the rivalry between the two in the early 1900s, which is a fun change from the usual “walk, look, repeat” tourist route.
If you’re the kind of person who likes stories with characters and conflict, these stops work well. You’re seeing how people tried to capture and sell the canyon experience long before social media existed.
Hermit Road Shuttle Stops: Best Way to Do These Viewpoints

Once you’re ready, the audio tells you when to hop onto the park’s free shuttle. Some areas along the rim are only practical by shuttle, so this part matters.
The audio is helpful here because it guides you to specific overlooks along Hermit Road, like you’re following a self-paced “hop on, hop off” route.
If you’re worried about timing, don’t be. You can stop for photos as long as you want. The key is to listen when the audio tells you to get off at the next stop, and then re-check what direction you’re heading.
Bright Angel Trail Views at Trailview Overlook

At Trailview Overlook, the narration points your attention to the Bright Angel Trail—one of the big hiking routes down toward the Colorado River.
Even if you never hike, this overlook helps you “see” the canyon effort. You might catch people climbing back up, looking exhausted in that very real, sweat-on-their-forehead way.
If you’re hiking-minded, this stop gives you a reality check. The canyon is breathtaking, but it’s also work.
Maricopa Point to Powell Point: Mining, Exploration, and Scale
Next you’ll arrive at Maricopa Point, which the audio connects to uranium mining history. It’s not the typical “rocks and vibes” story. It’s a reminder that people have tried to extract value from this place, not just admire it.
Then comes Powell Point, which honors explorer John Wesley Powell and his role charting the Colorado River. If you’ve read anything about Powell, this stop makes the history feel more immediate. If you haven’t, it gives you a clear entry point.
These stops also work because the viewpoints feel slightly different from each other. One might emphasize the river, another the cliff textures, and another the hiking lines you can trace.
Hopi Point and Mohave Point: Eagles, River Power, and Quiet Details
At Hopi Point, the audio talks about bald eagles and their connection to the Hopi people, plus how to spot them. This is one of those places where a little patience can pay off—if the sky is right, you’ll feel like you’re watching the canyon’s wildlife story unfold.
Then you reach Mohave Point for a stronger focus on the Colorado River itself. From the rim, it always looks both tiny and powerful. The audio keeps you oriented so you don’t just admire, but also understand what you’re seeing.
Granite Rapids at Monument Creek Vista and Pima Point Listening
Monument Creek Vista is where the audio points out intense rapids—Granite Rapids—and connects that to stories of river guides. The tour also includes a note about the first female river guide and how she got started, which adds a human thread to a place most people treat like scenery.
Then you’ll reach Pima Point. The narration highlights it as one of the best Colorado views. It even suggests a listening moment: if it’s quiet, you can hear the rushing water along the river.
That miner story is also placed near these stops—about someone preferring the rhythms of nature and living away from other people. It’s a strange, oddly compelling contrast with the modern crowds.
Desert View Drive: Birding Chances and Big Rim Views Toward the Watchtower
After the Hermit Road shuttle portion, the tour continues east along Desert View Drive. This is a different vibe—more open, more spacious, and often a nice change after the denser rim viewpoints.
At Pipe Creek Vista, the audio targets birders and mentions rarer species, even including the ultra-rare California condor as a possibility to watch for.
Then you’ll stop at Duck on a Rock Viewpoint. The audio keeps it light and observational: the rock formation is claimed to look like a duck. It’s the kind of stop where you’ll either grin and see it, or you’ll laugh at yourself trying.
Grandview, Lipan, and Navajo Points: Choose Your Angle of the Canyon
Grandview Point comes next, described as a serious viewpoint and also as a trailhead for a hike below the rim. If you’re eager to stretch your legs beyond short overlook walks, this is where you might linger.
Lipan Point adds another river view plus facts about geology. This is a nice “build your understanding” stop—each one adds a slightly different lens.
Finally, Navajo Point is the highest viewpoint on the south rim in this route, at about 7,500 feet above sea level. The audio positions it as the late-game payoff, so you’re not surprised to feel your scale awareness jump when you arrive.
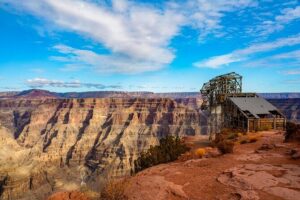
Desert View Watchtower: The Iconic Finish
The tour ends at Desert View Watchtower, a stone structure perched on the canyon edge. In certain seasons, you can climb to the top for an even more unusual angle on the views.
Even if you skip the climb, this is the right end point. It gives you a “you made it” feeling after hours of viewpoints and stories.
After the watchtower, the tour also includes a remote lookout popular for sunrise and sunset, with restrooms. That’s useful if you’re timing your visit around light, not just a checklist.
South Kaibab Trail and Tusayan Ruins: Two Stops With a Different Tempo
This route also includes a stop connected to the South Kaibab Trail, which is different from the Bright Angel Trail. The audio explains that South Kaibab follows a ridge out to Skeleton Point, with the promise of 360-degree views.
You might not hike the trail. Still, being able to identify the ridge and the direction helps make the canyon feel three-dimensional.
The tour also includes Tusayan Ruins and Museum. The audio points you toward learning about ancient cultures, and you’ll likely enjoy the walk through the ruins using the signage for guidance. This is a good break from only rim viewpoints, and it adds a layer of time depth.
Pacing It Right: How to Keep the App and Your Day in Sync
This route is about 3 to 4 hours and covers over 30 miles with more than 55 stories. That doesn’t mean you must rush. It means you’ll want to plan for stops that add up.
Here’s how to pace it without losing the experience:
- Start early if you can, so you’re not fighting peak crowds at the overlooks.
- Use the app to find the next story, then decide how long you stay.
- If you’re doing lots of short walks, expect the day to creep longer than you think.
If you find the app confusing at first, that’s usually a setup issue, not a bad tour. Keep the phone charged. Keep the app running. And if you hit the shuttle section, pay attention to the audio instructions before you move.
Who Should Book This (and Who Might Skip It)
This is ideal for you if you want:
- Narration tied to real stops so you learn while you look
- Flexibility to pause for photos and snacks
- A budget-friendly per-car price that works for small groups
- Offline access after a one-time download
You might not love it if:
- You hate phone setup or aren’t comfortable using GPS-style prompts
- You prefer a classic guided tour where someone controls the shuttle logistics
- You expect the shuttle segment to feel perfectly effortless with zero confusion
The big pattern in the feedback is that once you get the hang of it, the tour can feel smooth. But if you’re thrown off at the start point or in the shuttle handoffs, it can turn into extra mental work.
Should You Book This Grand Canyon South & East Rim Audio Tour?
Book it if you’re traveling with up to 4 people, you want a structured route without fixed tour timing, and you’re willing to download and set up the app before you start driving. The per-car price and the offline flexibility can make it a smart value, especially on a day when you don’t want to pay for a guide.
Skip it if you already feel confident navigating the South Rim, and you’re not interested in listening to background stories while you drive. The canyon is strong enough on its own, and you can absolutely enjoy it with park signage plus a simple map. This tour only truly pays off when you want that extra layer of context at each overlook.
If you’re on the fence, here’s my practical rule: if you can spare 20 minutes before your trip to download and test the app audio on your phone, you’re the kind of person this works for.
FAQ
Is the $16.99 price per person?
No. It’s priced per group (up to 4 people) for the vehicle, so you’re not paying separately for each traveler.
Does this include Grand Canyon entry fees?
No. Entry ticket to Grand Canyon is not included.
Can I use the audio tour without cell service?
Yes, if you download it first while you have strong wifi/cellular. After download, it works offline.
Is this a guided tour where someone meets you?
No. This is self-guided. You go to the starting point on your own and start the first story point in the app so the audio begins automatically.
Do I need the shuttle to reach some stops?
Some areas on the South Rim route are only accessible by shuttle, so you should be ready to use the park’s free shuttles during parts of the route.
How long does the tour take?
Plan for about 3 to 4 hours to complete the route, which covers roughly 30+ miles and more than 55 audio stories.